

![How to Format USB to FAT32 on Mac [100% Work]](https://i0.wp.com/www.thepanthertech.com/wp-content/uploads/2024/03/image1.jpg?resize=1430%2C947&ssl=1)
Macs support various file systems, with default being OS X Extended. However, FAT32 is still relevant, if you wish to especially use your USB across multiple platforms like Windows, Mac, and Linux. In this guide, we’ll discuss three methods to format USB to FAT32 on Mac, and also share a bonus tip for data recovery without a backup after formatting. Besides, we’ll also discuss potential challenges in formatting your USB drive. Let’s learn how to format to FAT32 on Mac!
What Is FAT32 Format?
Before we discuss how to format USB to FAT32 on a Mac, let us give you a brief overview of a FAT32 file system. FAT32, short for File Allocation Table 32, is a file system using 32-bit data to organize data on storage devices like USB drives. It’s effective for such devices. However, it doesn’t work with CD and DVD drives due to its 512-byte sector requirement.
But FAT32 is compatible with Mac, Linux, and Windows. It can support attributes like read-only, hidden, system, volume, directory, and archive. Now, let’s get straight to point and check how to format a flash drive to FAT32 on a Mac in next section.
How to Format USB to FAT32 on Mac
You have a few options to convert USB to FAT32 Mac based on your expertise. Check them out below and pick one that you’re at ease with. Here’s how to format to FAT32 on Mac in three ways:
Format USB to FAT32 on Mac with Disk Utility
When in a hurry, you can do a quick Mac format USB FAT32 with “Disk Utility,” which is an in-built comprehensive toolkit for managing all your storage tasks. It formats, erases, partitions, and fixes internal and external drives, covering everything from hard drives and SSDs to USB sticks and SD cards.
Formatting with Disk Utility is easy, only takes a couple of minutes, and works well with 32 GB USBs. Here’s how:
Step 1: Plug in USB you want to format.
Step 2: Open “Applications,” choose “Utilities,” and then click “Disk Utility” to launch it.
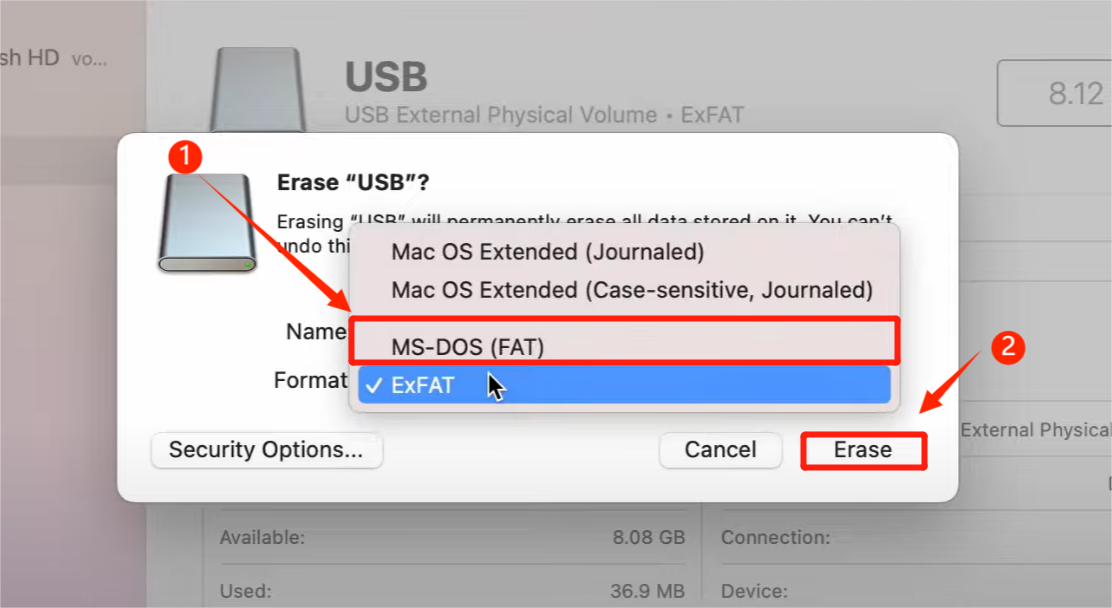
Step 3: Pick your USB from storage devices and click on the “Erase“ button above.

Step 3: Choose “MS-DOS(FAT)” file system, name it, and hit “Erase” again.
Bonus Tip: Easiest Way to Recover Data From Formatted USB
We’ve mentioned earlier that performing a Mac format USB FAT32 can erase all data. If you forgot to create a backup and formatted your USB, you can wash your hands off your data.
But still all is not lost as you can easily recover formatted data from your USB drive with help of 4DDiG Mac Data Recovery. It’s a powerful tool to locate and extract hidden, lost, corrupted, or deleted data that are otherwise deemed impossible to retrieve. Check out this tool’s fabulous features:
- Recover data from 2000+ Mac-based internal/external devices including hard disks, USBs, SD cards, digital cameras, drones, etc.
- Retrieve data from various data loss scenarios like formatting, accidental deletion, CPU failure, system crashes, and virus attacks.
- Free preview to chek recovered files before saving them.
- Retrieve 2000+ file formats in just three simple clicks.
- Offers high success rate, fast scanning, and 24/7 technical support.
- Compatible with T2 chip, M1, M1 Pro, M1 Max, and macOS Sonoma systems.
Here’s how to recover lost data from Mac format USB FAT32 with this tool:
Step 1: Install Mac recovery tool on Mac and connect your USB to your computer.
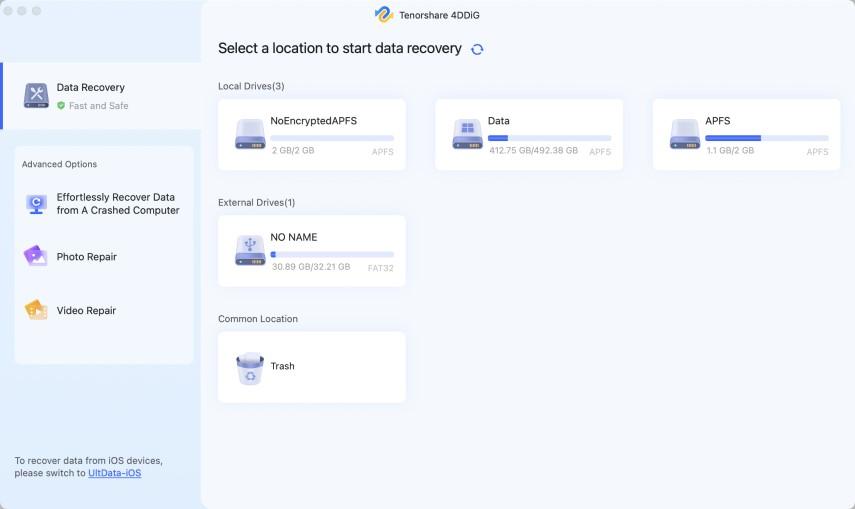
Step 2: Launch tool and choose USB for recovery. Hover over desired location, and a “Scan” icon will pop up in lower right corner. Click to start searching for files lost due to formatting.
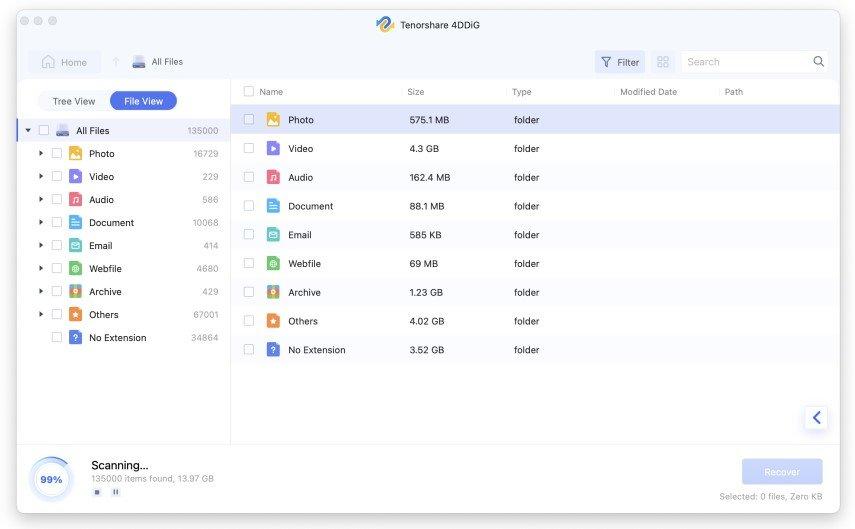
Step 3: The recovery process will take some time. Once it’s done, you can preview specific file types by clicking on them. Hit “Recover,” to choose a location to save files to a safe location in another partition than one where you lost them to prevent overwriting.
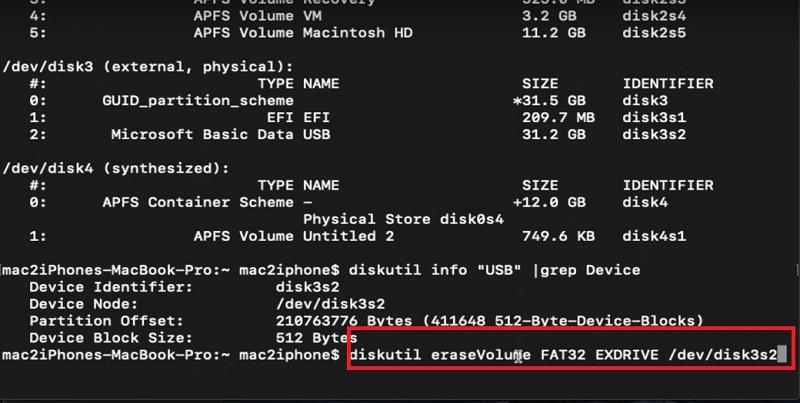
Format USB to FAT32 on Mac with Terminal
Another way to convert USB to FAT32 Mac is via “Terminal.” It’s a command-line interface with advanced capabilities and root-level access. But it has no friendly GIU, requires a bit of technical know-how, and is riskier if not used carefully. Here’s how to format a flash drive to FAT32 on Mac with Terminal:
Step 1: Connect USB you want to format as FAT32 with your Mac.
Step 2: Open “Applications,” choose “Utilities,” and then click “Terminal” to launch it.
Step 3: Type “diskutil list” to see list of external devices and identify your USB (e.g., /dev/disk1) among them. Here 1 is number of your disk.
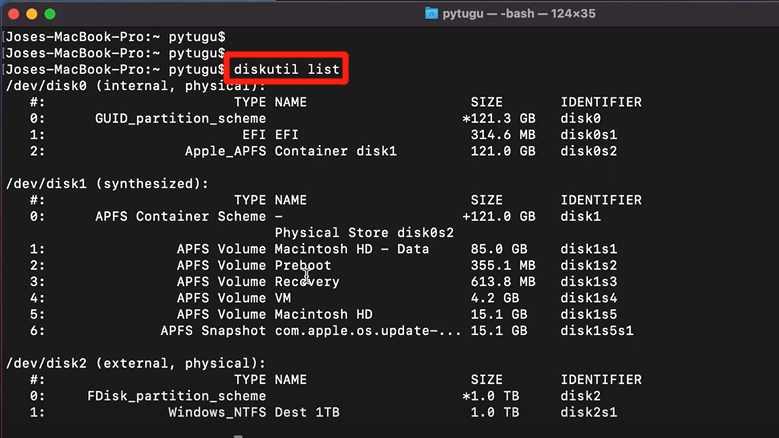
Step 4: Run this command: “sudo diskutil eraseDisk FAT32 MBRFormat /dev/disk3” and replace “dev/disk3” with your device’s path.
Format USB to FAT 32 on Mac with Third-Party Tools
You can also use third-party tools for Mac format USB FAT32, as they offer more features than Disk Utility or Terminal. Some popular options include:
- GParted
- iBoysoft DiskGeeker
MacClean360 - BitRaser
- Super Eraser
They are user-friendly and require no manual tweaking to format storage devices like USBs. So, this makes them ideal for beginners as well as professionals looking for thorough formatting without data loss, and consuming much time.
In addition, they allow flexible resizing, splitting, creating, deleting, and formatting of partitions to optimize disk space. However, they may not be free to use and require a paid subscription.
Why Can’t I Format USB to FAT32 on Mac?
When you’re unable to convert USB to FAT32 Mac it could be due to many reasons such as following:
- Volume Size Limitations – FAT32 has a max volume size of 2TB and a file size limit of 4GB. If your USB is larger or you need to store bigger files, FAT32 won’t work. So, consider using exFAT for formatting, as it supports 128 (petabytes) PB of volume size.
- Disk Errors – Before you learn how to format to FAT32 on Mac, check for disk errors as they can prevent you from formatting your USB. The “First Aid” feature in Disk Utility can help in that regard to repair disk errors.
- Incompatibility Issues – Some USB drives may not be compatible with your macOS version due to firmware or original formatting. For example, if your USB comes with an NTFS file system, which is a Windows file system, macOS can read it but won’t write to it unless you use extra software.
- Incorrect Formatting Procedure – Mistakes in the formatting steps like using wrong Terminal command can lead to problems. Therefore, always follow the correct procedure.
- USB Drive Damage – Physical damage or internal degradation over time may render USB non-formattable.
FAQs about How to Format USB to FAT32 on Mac
Q1: Does Mac support FAT32 format?
Yes, Mac does support FAT32 format, allowing it to read or write on a device with that system. Although FAT32isn’s Mac’s standard file system, it still works but comes with a volume size limitation of 2TB. If you want more volume size options, consider formatting your USB to exFAT.
Q2: How do I know if my USB is FAT32 on Mac?
You can use “Disk Utility” to learn if your USB is formatted to FAT32 file system. Here’s how:
Step 1: Plug in USB whose format you want to check.
Step 2: Open “Applications,” choose “Utilities,” and then click “Disk Utility” to launch it.
Step 3: Pick your USB from storage devices and on next page, you’ll learn its format.
Conclusion
So, that’s all there was to learning how to format a flash drive to FAT32 on Mac. We discussed three ways based on your skill level and ease of use to format USB to FAT32 on Mac. If you don’t have a backup and lost your data after formatting, consider using a third-party tool like 4DDiG Mac Data Recovery to retrieve data lost due to formatting with a high success rate. The tool also offers a comprehensive set of features for file recovery from various data loss scenarios and storage devices.
